One of the biggest strengths of VS Code is its portability between technologies and projects. Unlike alternatives it is much easier to not only get up and running on other computers but also to share a working configuration with a team or the public in general. For the past year I’ve been working heavily on a WordPress plugin scaffold that allows developers who are unfamiliar with WordPress, and who may not be working on a given plugin for long, to get started with it quickly. While developers can still use any editor they want for their work, part of this process has been including a VS Code configuration, including recommended plugins and settings, that will allow someone who has never touched WordPress before to edit and debug code as if they’ve been working on the platform for years. Here’s how that works:
Sharing extensions
The first key to getting a team running quickly is helping them find the right extensions for debugging and other tasks. VS Code makes this easy by allowing you to include a list of recommended extensions right in your project.
To get started, in your repository create a .vscode folder and add an empty extensions.json file to it. Then simply populate a recommendations array with the ID’s of the extensions you would like your users to install. Below is an example for the primary project I’ve been working on with my team lately:
{
    "recommendations": [
      "bmewburn.vscode-intelephense-client",
      "neilbrayfield.php-docblocker",
      "wongjn.php-sniffer",
      "felixfbecker.php-debug",
      "dbaeumer.vscode-eslint",
      "johnbillion.vscode-wordpress-hooks",
      "esbenp.prettier-vscode"
    ]
  }
Commit the file and, once a new dev opens the project they will be presented with a prompt to install the recommended extensions.
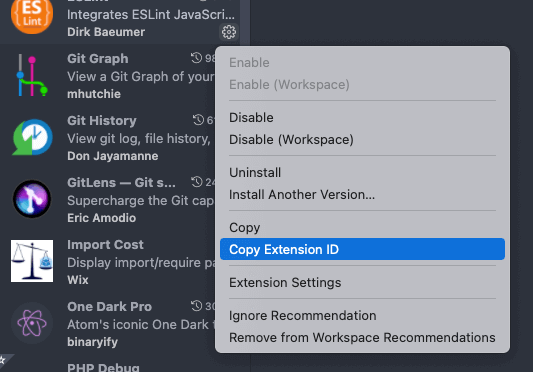
To get an extension’s ID, simply right-click on the extension in question and select Copy Extension ID from the menu that pop’s up.

Setting common settings
Installing extensions won’t help anyone if they don’t know how to use them. Take, for example, PHP Debug which requires a specific setup to work with any given development environment. As I also package a Lando configuration with this project I can add the necessary setup to the repository as easily as I added the extensions.
To configure PHP Debug to work with the recommended dev environment, in your .vscode folder, first create a launch.json file. Then populate the file with the configuration for your development environment. Below is the launch config from the same work project as above.
{
    "version": "0.2.0",
    "configurations": [
      {
        "name": "Listen for XDebug",
        "type": "php",
        "request": "launch",
        "port": 9003,
        "log": true,
        "pathMappings": {
            "/app/wordpress/wp-content/plugins/atlas-content-modeler/": "${workspaceFolder}/atlas-content-modeler",
            "/app/wordpress/": "${workspaceFolder}/wordpress",
        }
      },
      {
        "name": "PhpUnit dummy",
        "type": "php",
        "request": "launch",
        "port": 9001,
      }
    ],
    "compounds": [
      {
        "name": "PhpUnit",
        "configurations": [
          "Listen for XDebug",
          "PhpUnit dummy"
        ]
      }
    ]
  }
You can do the same here with a settings.json file including any common settings for your project however I caution you to be careful here. The idea is to help a developer get working on your project quicker, not to change how they work in general. As such, only include settings that are very specific to the project itself and avoid anything that might otherwise change visual or other elements of their workflow.
Using a combination of extensions and settings that are project specific can really lower the barrier of entry for a given project by allowing developers to get running much quicker than they would otherwise. In our case, I combine these settings with Make targets and a Lando dev environment to ensure that any new developer, even one who has never seen PHP much less WordPress, can work on our WordPress plugins in a matter of minutes rather than hours or days.
 Chris Wiegman